Cutting Cornice Flat
So I Installed Crown Molding In My Home Office This Week And It Was The Hardest And Most Frustrating Experience I Hav Crown Molding Moldings And Trim Molding

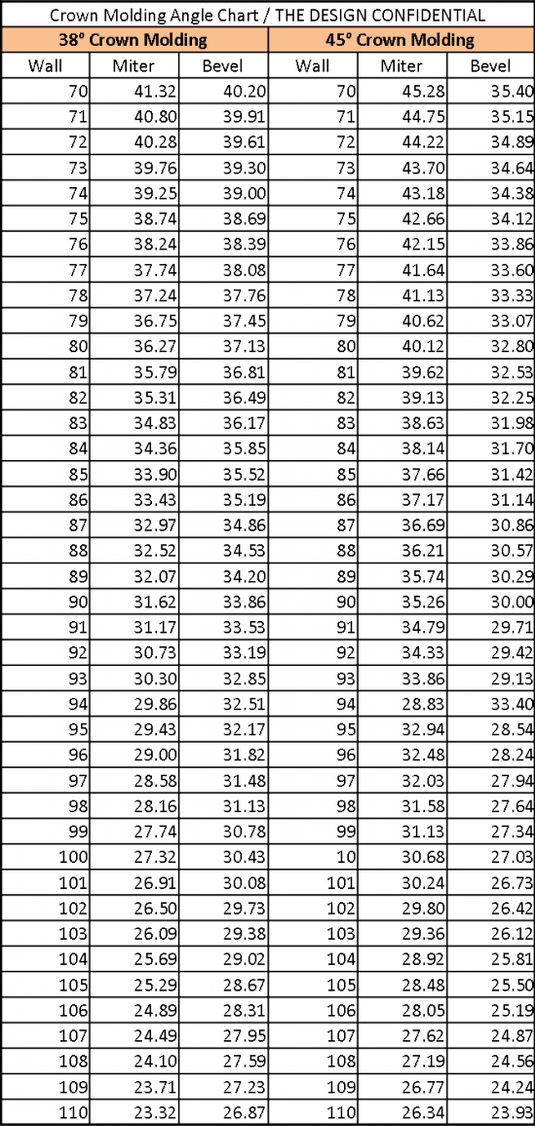
Pin On Cutting Crown Molding

Pin On Woodworking Tips

Creative Step Down Ceiling Feature In 12 Steps Molding Ceiling Cornice Cornice Design

How To Dead End Crown Molding Diy Home Improvement Crown Molding Home Projects

Diy Tutorial Crown Moulding Crown Molding Moldings And Trim Diy Home Improvement

How to cut crown molding.
Cutting cornice flat.

Pin On Things To Wear

Pin On Crafting

Pin On Ceiling Design

Pin On Trim Ceilings Doors Windows Baseboards

3 Step Cornice Regency Plaster Mouldings Plaster Ceiling Design Art Deco Interior Art Deco Interior Living Room

Flat Ceiling Cornice With Flat Wall Crown Moulding Ceiling Trim Family Room Remodel Molding Ceiling

Flat Ceiling Cornice Wall Crown Mouldings With Stacked Square Ceiling Trim On Shaker Cabi Crown Molding Kitchen Kitchen Cabinets Trim Kitchen Cabinet Molding

Pin On Diy Tips
Pin On Wainscoting More

Pin On Woodworking

How To Install Crown Molding Trim Carpentry Crown Molding Installation Molding Installation

Gyprock Presto Cornice 4800x90mm Manufactured Home Remodel Home Ceiling Cornice

Pin On For The Home

Samples Xps Coving Led Lighting Uplighter Wall Cornice Flat Side Lighting Cornice Co Bedroom Lighting Design Strip Lighting Ceiling Light Design

Diy Cornice Board From Cardboard T Moore Home Design Diy And Affordable Decorating Ideas Cornice Boards Diy Window Cornice Diy Small Room Decor

Flat Stock Crown Molding Crown Moldings Moldings And Molding Ideas On Pinterest Ceiling Trim Baseboard Styles Modern Baseboards

Exterior Interior Mouldings Crown Molding Cornice Design Ceiling Design

Pc 617 Small Long Steps Cornices Centre Cornice Modern Flat Plaster Cornice
Https Encrypted Tbn0 Gstatic Com Images Q Tbn 3aand9gctsmyxjmovdk6l0oi0zzbhr 33yh4hwywxqdqsggsbdq3han 7w Usqp Cau

How To Install Crown Molding Crown Molding Installation Diy Crown Molding Molding Installation

Pin On Diy Home Improvement Home Maintenance Tutorials

Shaker Crown Profile Modify With Flat On Top Angle And Flat On Bottom For Coffers Trey Ceiling Crown Molding Shaker Style Cabinets Country Bedroom Furniture

Pin On Kitchen Design Meets Inspiration

Scotia Coving Plaster Cornice Art Deco Flat Coving Also Ideal For Angled Ceiling With Slope Fi Molding Ceiling False Ceiling Living Room False Ceiling Bedroom
Source : pinterest.com
